Pages

Tuesday, December 26, 2017

how to make a christmas elf

I saw the cutest elf on social media and thought ..... what a great idea for Christmas for the little ones in our family.


I'll make one for each kid (happy excited face). Then I counted .... the total - 27. Still with my excited voice in my head, but less enthusiastic .... let's only make 1 per family. That brought my count down to 10.

I've attached the pattern and embroidery file (for Brother) below.


I thought a lot about the gender part of the elf. Do I put dresses on the girls and pants on the boys? Can I make just one elf in a gender neutral way? I made a couple different faces and showed them to my 3 year old grandson. When I asked him to pick the one he liked the best, he pointed to the one I purposely made more feminine. 


My mom came to visit for a week during Thanksgiving and she helped cut all the fabric. Thank goodness for mom cause cutting is the WORST!


While she was cutting, I embroidered the faces, shirts, and boots.


I sewed, then lightly stuffed the ears, attaching them to the neck and head back.


Then came the neck piece.


Legs were next. Sew together the legs, white shoe trim, and big elf shoes.


Fold in half and sew. For each arm and leg, leave a small spot between the notches for stuffing.


Turn them right side out.


Sew the little pleats in the arms.


Add the hands.


Sew together and turn right side out. Again, leave little openings between the notches for stuffing.


Next the body front. Sew the body top to the bottom, matching up notches.


Sew the legs to the body bottom.


Make sure the feet go the way you want.


Sew down the arms.


Here's the back bottom and top. There is one photo with 3 different phases of the construction. 


Sew the back and bottom to the front, matching up the notches.


Shove everything inside the body.


Turn the head right side out and shove inside the body too, matching up the notches. Sew. This is the toughest part of the whole thing. Double stitch to make sure everything stays together.


Pull everything right side out and stuff. I stuffed the head and body VERY firm.  The arms and legs were stuffed lightly to make them more bendable.

Hand sew up all the little openings that you used for stuffing and add the hat. I sewed the hats to the head. Then I used a little fabric glue over the back and where the bell was connected to the hat.


I could not be happier to put these guys into their boxes and send them on their way to their kid house. While I realize that not all the kids will be crazy about their elf, I do hope they know that each one was made with love and with them in mind.


Sunday, October 15, 2017

holly's diy storage bed - the build

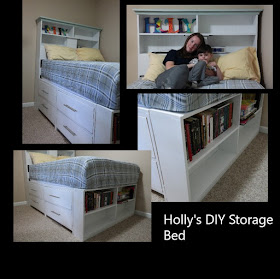
 It's finally done! Weeks and weeks of work on the design and build is finally done, and I can't believe it actually looks pretty darn good!

If you missed the design, you can see it here.


The bed is in place, clothes put away and the books are the shelves. A sigh of relief and the garage is finally back to holding cars and not bed parts. Here's some pictures of the build.


We started with the bookcase since it was the easiest to do.


The deal struck with Holly was since the veto was made on every bed we tried to purchase, that she would help sand and paint each piece.


She lived up to her end and what a fine job she did!


The back cabinets were easy also as they were only there to support the mattress. These cabinets would face the wall and not be seen.


Each piece was painted whether they were back or front cabinets.


Front cabinets were made which held the drawers. This was the hardest part for me, but they turned out fine.


The white paint made everything look bright and clean.


The drawer build wasn't as bad as I expected. We cut all the sides.


Dado cuts were made to help keep everything nice and square. 


Quarter inch plywood was cut and side into place.


Burke and Holly were absolutely fascinated that they could stand the broom up all by itself.


Work on the headboard began.


Wiring was done for the power center in the headboard.


Then we added some fancy trim at the top and leftover bead board from the basement ceiling was used as the back.


Special trim needs a bit of a pop of color - not too much.


Finally the bed is assembled.


Drawers were filled.


Items plugged into the power center.


Books put away.


Even a nightlight.


Snug as a bug in a rug. It was a lot of work - but she loves it, and so do we. 

Thank goodness for Ana White's website.  Parts and pieces were taken from this and that piece and together we created my daughters vision. Thanks Ana for the plans and the confidence to believe I could do it!

Saturday, October 7, 2017

holly's bed - the design

There's been some shake up to the household lately, which led to some rearranging of beds. First our grandson came to live with us and he took the room which was already set up for incoming exchange students. It was all ready to be occupied - no effort needed.

Next, we took in a very lovely Chinese exchange student, Ivy, who was in need of a host family.

Our guest room was equipped with a queen size bed and it had to go. It was meant for out of town family. It is lovely in the room, but there was no room for a desk and other things a teenager needs. So, out it came - and we turned my photography room into the new guest room.

So what to do about a bed then for our Ivy? I've been promising Holly a new bed for some time. So we moved Holly's full size bed into the Ivy's room complete with some fix up, a new mattress topper and desk. Room.Done.

Then the search for Holly's bed got under way. She picked out a new mattress, a very nice memory foam type that we got .... and who'd a thunk it - Menards all of places. They had the best price by far.

We began our exhaustive search for a new bed. Anyone who knows my Boo, knows that once she made up her mind, nothing changes it. The bed that even came close to what she wanted was well over $2000 - which was NOT going to happen.

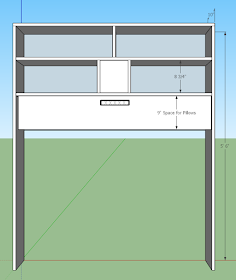
So we settled into designing and building a bed for her. I spent quite a bit of time at Ana White's website, browsing designs and looking at what others have done. We've been going at it for a few weeks now, which has kept me from writing, but I believe we are ready for a semi reveal. 

TA-DA!! 

The new full size storage bed with 4 (not 2) drawers, a bookcase in the head board and foot board, a built in charging station for her widgets and gizmos, and a motion sensor night light.


Honestly, the hardest part of this whole thing was the design. Getting the math right AND figuring out Sketchup is not for the faint heart.

It was an absolute requirement that the bed had 4 drawers and not the 2 you see on many storage beds. She veto'd many beds because of the 4 drawer rule.


Burke and I had the idea to add the USB charging station and night light. We also built in a normal plug outlet for her alarm clock. It's always to hard to reach the power behind these beds, so this time - we built it in.


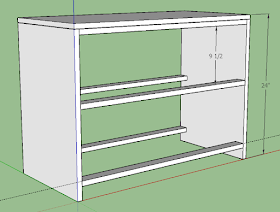
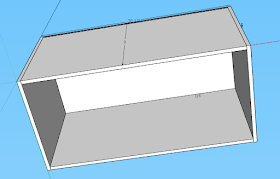
The drawer cabinet design did take some time as well, calculating efficient use of wood and measurements. We went with 15 3/4 wide because we got the most out of our plywood.

I did look to see if I could buy these cabinets at IKEA or a second hand store, but we found nothing that wow'd us. Not to mention, I wanted the entire bed to be the same material and color. Drawers are not the easiest to build, but we'll manage.


Since her bed pushes up against a wall, the back cabinets really are just holders for the mattress. I took care to make each piece modular so we could easily move them about.


The bookcase was the easiest and gives her plenty of room to store her books and do hickies.


The drawers are never fun for me. We contemplated many different way to give her drawers including bins or just shelves. The girl just wanted some drawers - so that's what she'll have.

I problem is that they just have to be perfect when dealing with drawer slides and that's super hard.

Next week, come back to see the building of the bed. So far, we're done with the foot board, cabinets, and almost all the drawers. I'm hoping we can finish those today and begin work on the head board tomorrow.

The cost you ask? I would say $300-$350. The wood costs were right around $200-$250, but the USB outlet and motion censored light were about $50/piece. Still the cheapest in cost - but when you add in time, it was almost worth buying the $2000 bed and be done with it.

How long is it taking? We get about 1 day and 1/2 a week to work on it, and this will be our 3rd week. I have big dreams of finishing this weekend. Keep your fingers crossed!